
環境
- MacOS BigSur 11.4
- Flutter 2.5.3
- Dart 2.14.3
やりたいこと
Stepperを使って段階的な表示をする。ボタンを押すと前の段落が非表示になって次の段落が表示される。的なUIを作っていく
Stepper
StepperというWidgetを使います。これはflutterが標準で持っているWidgetになるので何かをインストールする必要はありません。
まずはどんなものが出来上がるか見てみよう
こんなUIがとても簡単に出来上がります。
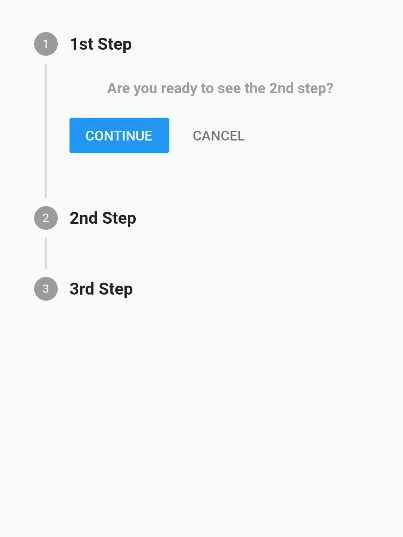
CONTINUEを押すと1st Stepの表示が消えて2nd Stepの中身が表示される、って感じになります。
サンプルソースコード
上を実現するためのソースコードがこちらです。最後のステップのCONTINUEを押下すると画面が切り替わるようにしてるのは一旦無視していただいても大丈夫です。
import 'package:flutter/material.dart';
import 'package:flutter/cupertino.dart';

class StepTest extends StatefulWidget {

  @override
  _StepTest createState() => _StepTest();
}

class _StepTest extends State<StepTest> {

  int _currentStep = 0;
  bool _end = false;

  @override
  void initState(){
    _currentStep = 0;
    super.initState();
  }
  @override
  Widget build(BuildContext context) {
    return Scaffold(
      // backgroundColor: Colors.white,
      resizeToAvoidBottomInset: false,
      body: SafeArea(
        child: SingleChildScrollView(
          child: body()
        )
      )
    );
  }

  Widget body() {
    return Container(
      padding: EdgeInsets.all(10),
      height: MediaQuery.of(context).size.height * 0.9,
      child: _end
        ? Column(
            mainAxisAlignment: MainAxisAlignment.center,
            children: [
              Center(child: Icon(Icons.night_shelter, color: Colors.amber, size: 50)),
              Center(child: Text('Have a good night', style: TextStyle(fontSize: 30))),
              Column(
                children: [
                  CupertinoButton(
                    child: Text('back'),
                    onPressed: () {
                      setState(() {
                        _end = false;
                        _currentStep = 0;
                      });
                    }
                  )
                ]
              )
            ]
          )
        : Stepper(
            currentStep: _currentStep,
            steps: [
              Step(
                title: Text('1st Step', style: TextStyle(fontSize: 16, fontWeight: FontWeight.bold)),
                content: Text(
                  'Are you ready to see the 2nd step?',
                  style: TextStyle(fontSize: 14, fontWeight: FontWeight.bold, color: Colors.grey)
                )
              ),
              Step(
                title: Text('2nd Step', style: TextStyle(fontSize: 16, fontWeight: FontWeight.bold)),
                content: Text(
                  'Are you ready to see the 3rd step?',
                  style: TextStyle(fontSize: 14, fontWeight: FontWeight.bold, color: Colors.grey)
                )
              ),
              Step(
                title: Text('3rd Step', style: TextStyle(fontSize: 16, fontWeight: FontWeight.bold)),
                content: Text(
                  'Are you ready to end this?',
                  style: TextStyle(fontSize: 14, fontWeight: FontWeight.bold, color: Colors.grey)
                )
              )
            ],
            onStepTapped: (index) {
              setState(() {
                _currentStep = index;
              });
            },
            onStepContinue: () {
              setState(() {
                if (_currentStep < 2) {
                  _currentStep += 1;
                } else if (_currentStep == 2) {
                  setState(() {
                    _end = true;
                  });
                }
              });
            },
            onStepCancel: () {
              setState(() {
                if (_currentStep > 0) {
                  _currentStep -= 1;
                }
              });
            }
          )
    );
  }
}
横方向にもできる?
できます。
Stepperのプロパティに `type`というのがあります。
これに StepperType.vertical、 StepperType.horizontal が設定できるようになっています。横方向にしたいときは StepperType.horizontalを設定してください。
動かすとこんな感じになります
以上、簡単ではありますが、 Flutterの `Stepper`Widgetの使い方の紹介でした。最後までお読みいただきありがとうございました。